Forgather server: end-to-end walkthrough
This guide walks you from a fresh install through training a small model and chatting with it — all from the Forgather server's web UI. It's intended as a first introduction to the UI; once you've done the round trip you'll have seen most of the major panels and how they fit together.
What you'll do:
- Install Forgather
- Start the server and connect
- Serve the docs (optional)
- Find the Tiny Llama tutorial project
- Inspect the configuration
- Queue and dispatch a training job
- Watch the run
- Serve the trained model
- Generate text from the new model
- Train the model for chat
What you'll need:
- A Linux machine with at least one CUDA-capable GPU (the example uses two; one works too — see below).
- Python 3.12+ and Node.js / npm. See Installation for distro-specific install commands.
- A local browser. If your training host is remote, you'll set up SSH port forwarding in step 2.
The whole walkthrough takes ~10–15 minutes once everything is installed, with most of that being the actual training run (~2 min on an RTX 4090, longer on smaller GPUs).
1. Install
If you haven't already, follow Installation.
The Docker install is the recommended method — the image bundles Python 3.12, the right CUDA wheels, every Forgather dependency, and a prebuilt SPA bundle, so the steps below Just Work the moment you land in the container. See Docker images for the full reference (CLI flags, env vars, runtime image for clusters, troubleshooting).
2. Start the server and connect
Defaults to http://localhost:8765/. On startup you'll see a banner
with a one-shot login URL:
    Forgather server is running at:
        http://127.0.0.1:8765/?token=4c4febdc07830cdd…
        http://localhost:8765/?token=4c4febdc07830cdd…

    CLI auth: token in /home/<user>/.config/forgather/server/auth_token (mode 0600)
    First successful token login will prompt to set a password for future browser logins.
Click (or paste) that URL into a browser on the same machine. Most GUI terminals need Ctrl+click (rather than a plain click) to open a link in your browser; on macOS Terminal use ⌘+click. The token is stripped from the address bar after it's exchanged for a session cookie, so it won't end up in your history. On a successful first login you'll be prompted to set a password — handy because future browser logins can use the password instead of the 64-character token. Skipping is fine; you can always sign in with the token again.
Without the URL, the same page shows a login form that accepts either
the token or the password. The token sits at
~/.config/forgather/server/auth_token (mode 0600); print it with
cat ~/.config/forgather/server/auth_token if you ever need it again.
Why a token? A loopback-bound server is reachable by any local user on the host, not just you. The token gates that exposure. CLI commands (
forgather sched,forgather job,forgather train --enqueue, …) read the token file automatically — you never paste it on the command line.
If your training host is remote, set up SSH port forwarding on the remote — forwarding the canonical ports for the Forgather server, inference jobs, TensorBoard, and MkDocs all at once is convenient because every spawned tool lives at a known port:
# Forgather Server: 8765
# Inference Server: 8137
# TensorBoard: 6006
# MkDocs: 8000
ssh -L 8765:localhost:8765 \
    -L 8137:localhost:8137 \
    -L 6006:localhost:6006 \
    -L 8000:localhost:8000 \
    user@dev-host
Then open http://localhost:8765/ on the remote. The token printed
on the remote console works as-is over the tunnel — paste it (or the
full URL) into the laptop's browser. If you also want to run
forgather CLI commands from the laptop against the tunnelled
server, point them at the remote token file:
export FORGATHER_SERVER_TOKEN=$(ssh dev-host cat .config/forgather/server/auth_token)
forgather sched status
The
Getting Started SSH section
has a ~/.ssh/config snippet you can drop in to make the port
forwarding permanent.
Heads-up: prefer
localhostover127.0.0.1. They're not always interchangeable on the client side. Some browser environments — Chromebook in particular — resolvelocalhostthrough the SSH tunnel as expected, but127.0.0.1hits the Chromebook's own loopback (which has nothing listening) and fails to connect. macOS and most Linux desktops treat the two identically, butlocalhostis the safer default. Same goes for the spawned-tool URLs further down (TensorBoard, MkDocs, inference servers): if a job card's clickable link doesn't resolve, swap any127.0.0.1forlocalhostand try again.
The sidebar's collapsible groups (Views, Tools, Services, Search Roots, Projects, Files) are all closed on first boot — expand the ones you want. Tools holds one-shot model-manipulation actions (Evaluate, Convert, Finalize, Update). Services holds the launchers for long-running spawned processes (Inference, Dataset, TensorBoard, MkDocs); each can also be saved as an auto-start service entry — see Saving a service for next time below.
At the bottom of the sidebar a footer bar carries four icon buttons:
- ⟳ Refresh data — re-reads projects, configs, and templates from disk. Use this after editing files outside the webui.
- ▶ / ⏸ Scheduler toggle — flips the dispatcher loop on/off (green when running, muted when paused).
- ↺ Restart server — re-execs the server process in place. PID, TTY, and running subprocesses (training, inference, dataset, …) all survive. Useful for picking up changes after you edit the config file.
- ⚙ Open server config — opens
server_config.yamlin the embedded editor. See Persistent CLI defaults further down.
3. Serve the docs
This step is optional but useful: the same docs you're reading now can be served locally from the running server, which is handy for flipping between the walkthrough and the live UI.
Open the Services group in the sidebar and click 📖 MkDocs….
The modal pre-fills the right mkdocs.yml (the bundled one at the
repo root); leave the rest at defaults and submit.

Heads-up: the first
mkdocs servebuild is slow — a couple of minutes typically — because it has to render all the example notebooks (mkdocs-jupyter). Subsequent rebuilds are quick.
Once the job's running, its card in the Jobs panel shows a clickable URL (port 8000 by default). With the SSH forwards in place, that link resolves transparently from the laptop. You now have these docs at http://localhost:8000/ alongside the UI you're using.
4. Find the Tiny Llama project
Expand the Projects group in the sidebar. You should see a
workspace tree clustered by forgather_workspace/ directory; the
bundled examples live under the examples/ workspace. Drill into
examples → tutorials → tiny_llama.
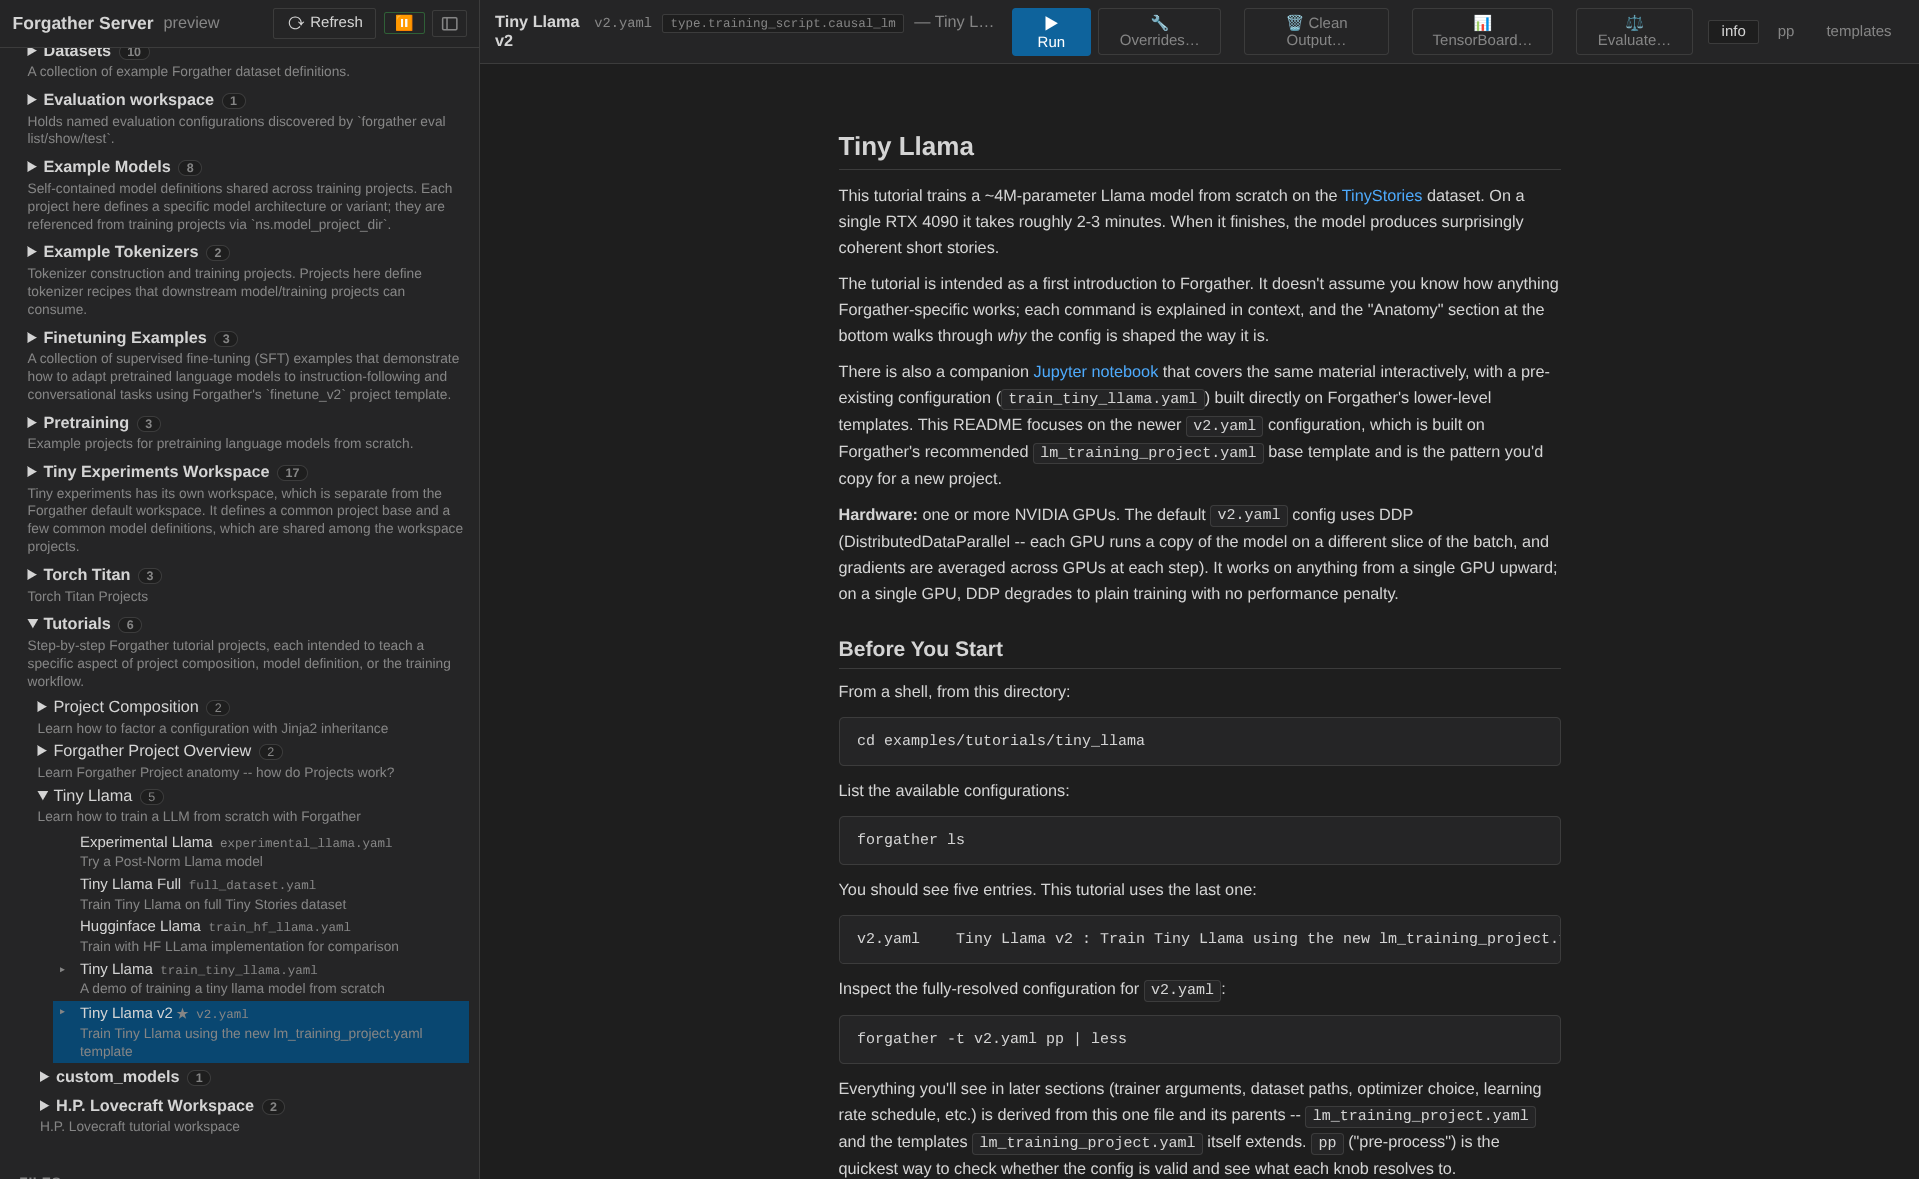
Clicking the project node selects its default config (v2.yaml) and
opens the project's README in the info tab. Take a moment to skim
it — the project trains a ~4M-parameter Llama on a subset of the
TinyStories dataset, and the README explains what's going on.
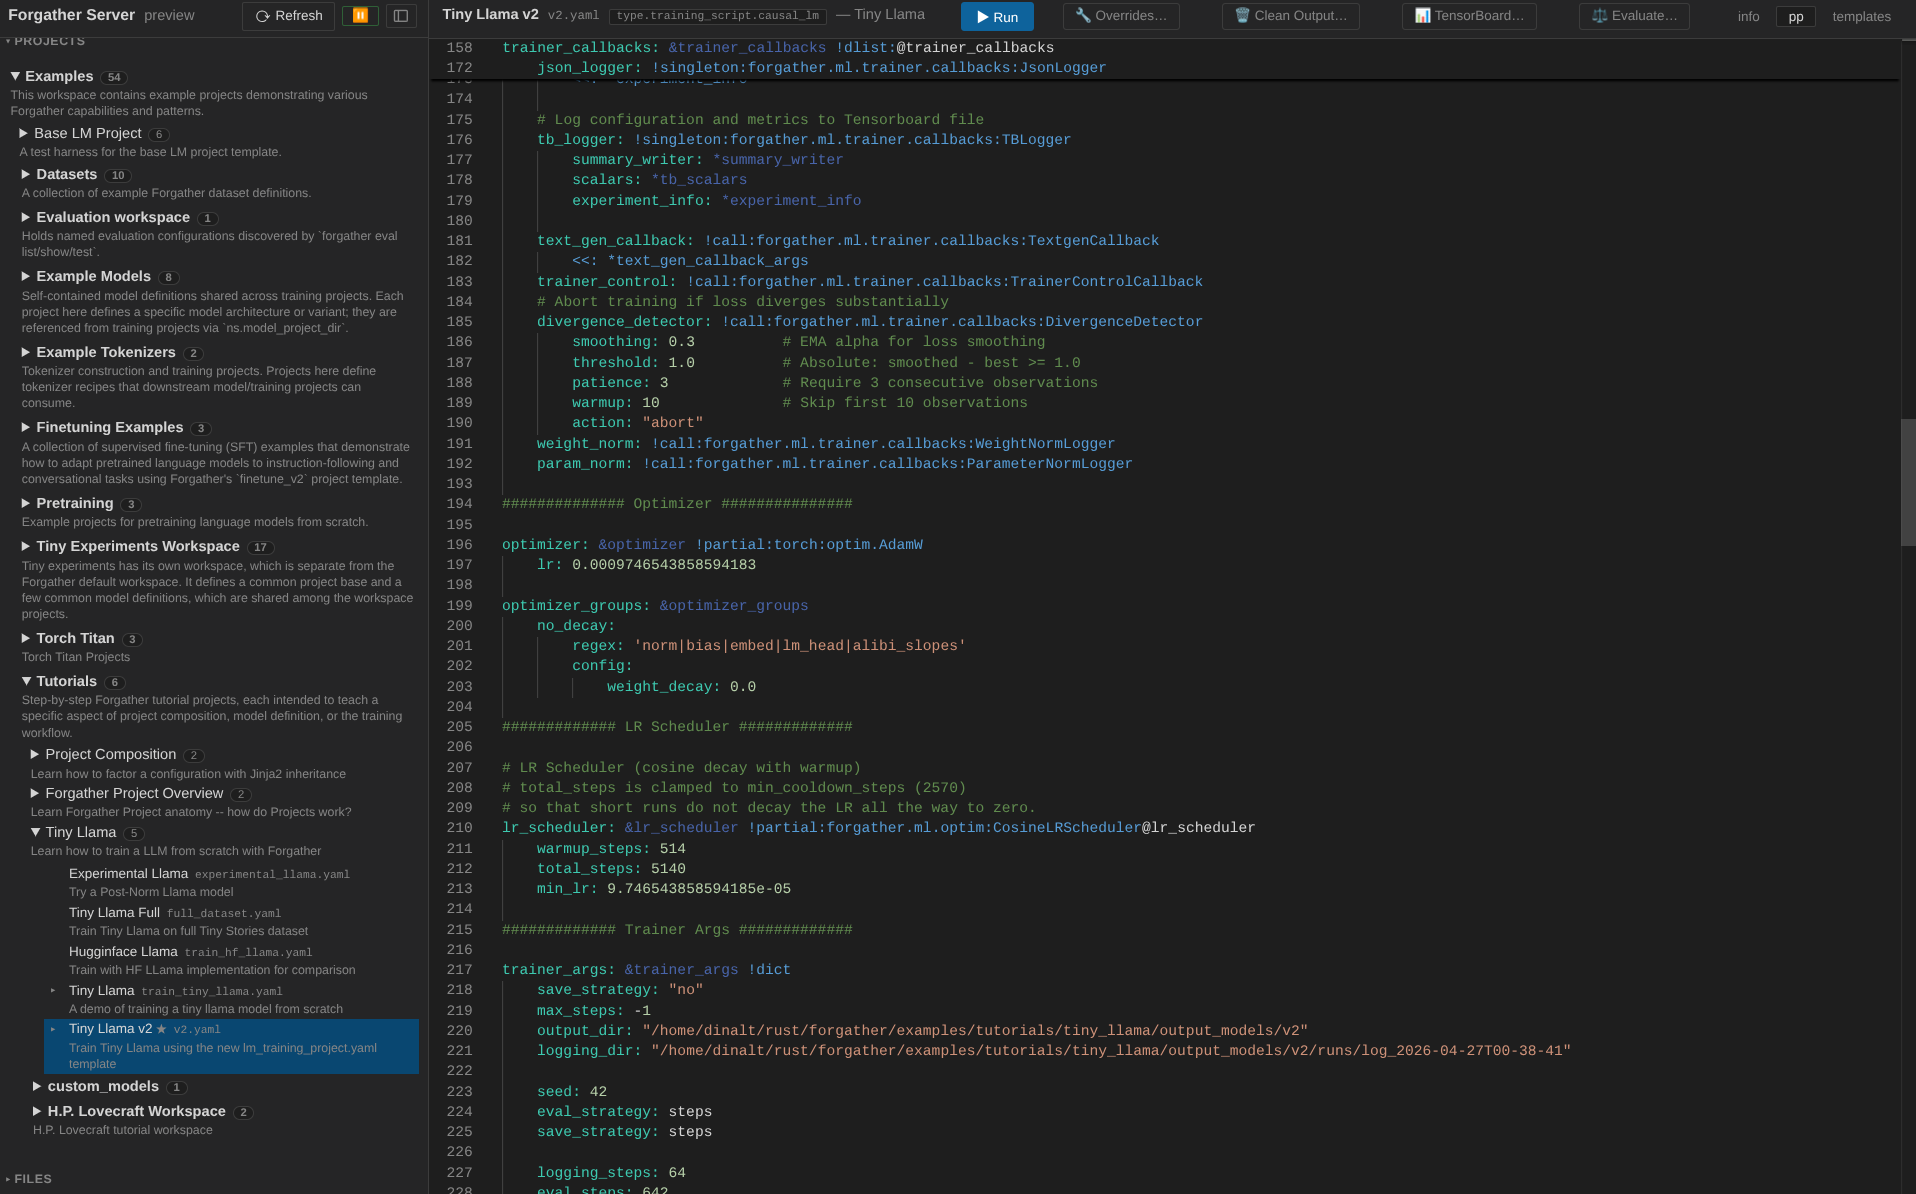
5. Inspect the configuration
The config viewer has three tabs: info (the README, currently shown),
pp (preprocessed YAML), and templates (template-dependency view).
Click templates to see the configuration's template graph. The
left panel shows the trefs view by default — every template that
contributes to v2.yaml's materialized configuration, with arrows
showing inheritance and includes. Clicking a node loads its source
in the right panel.
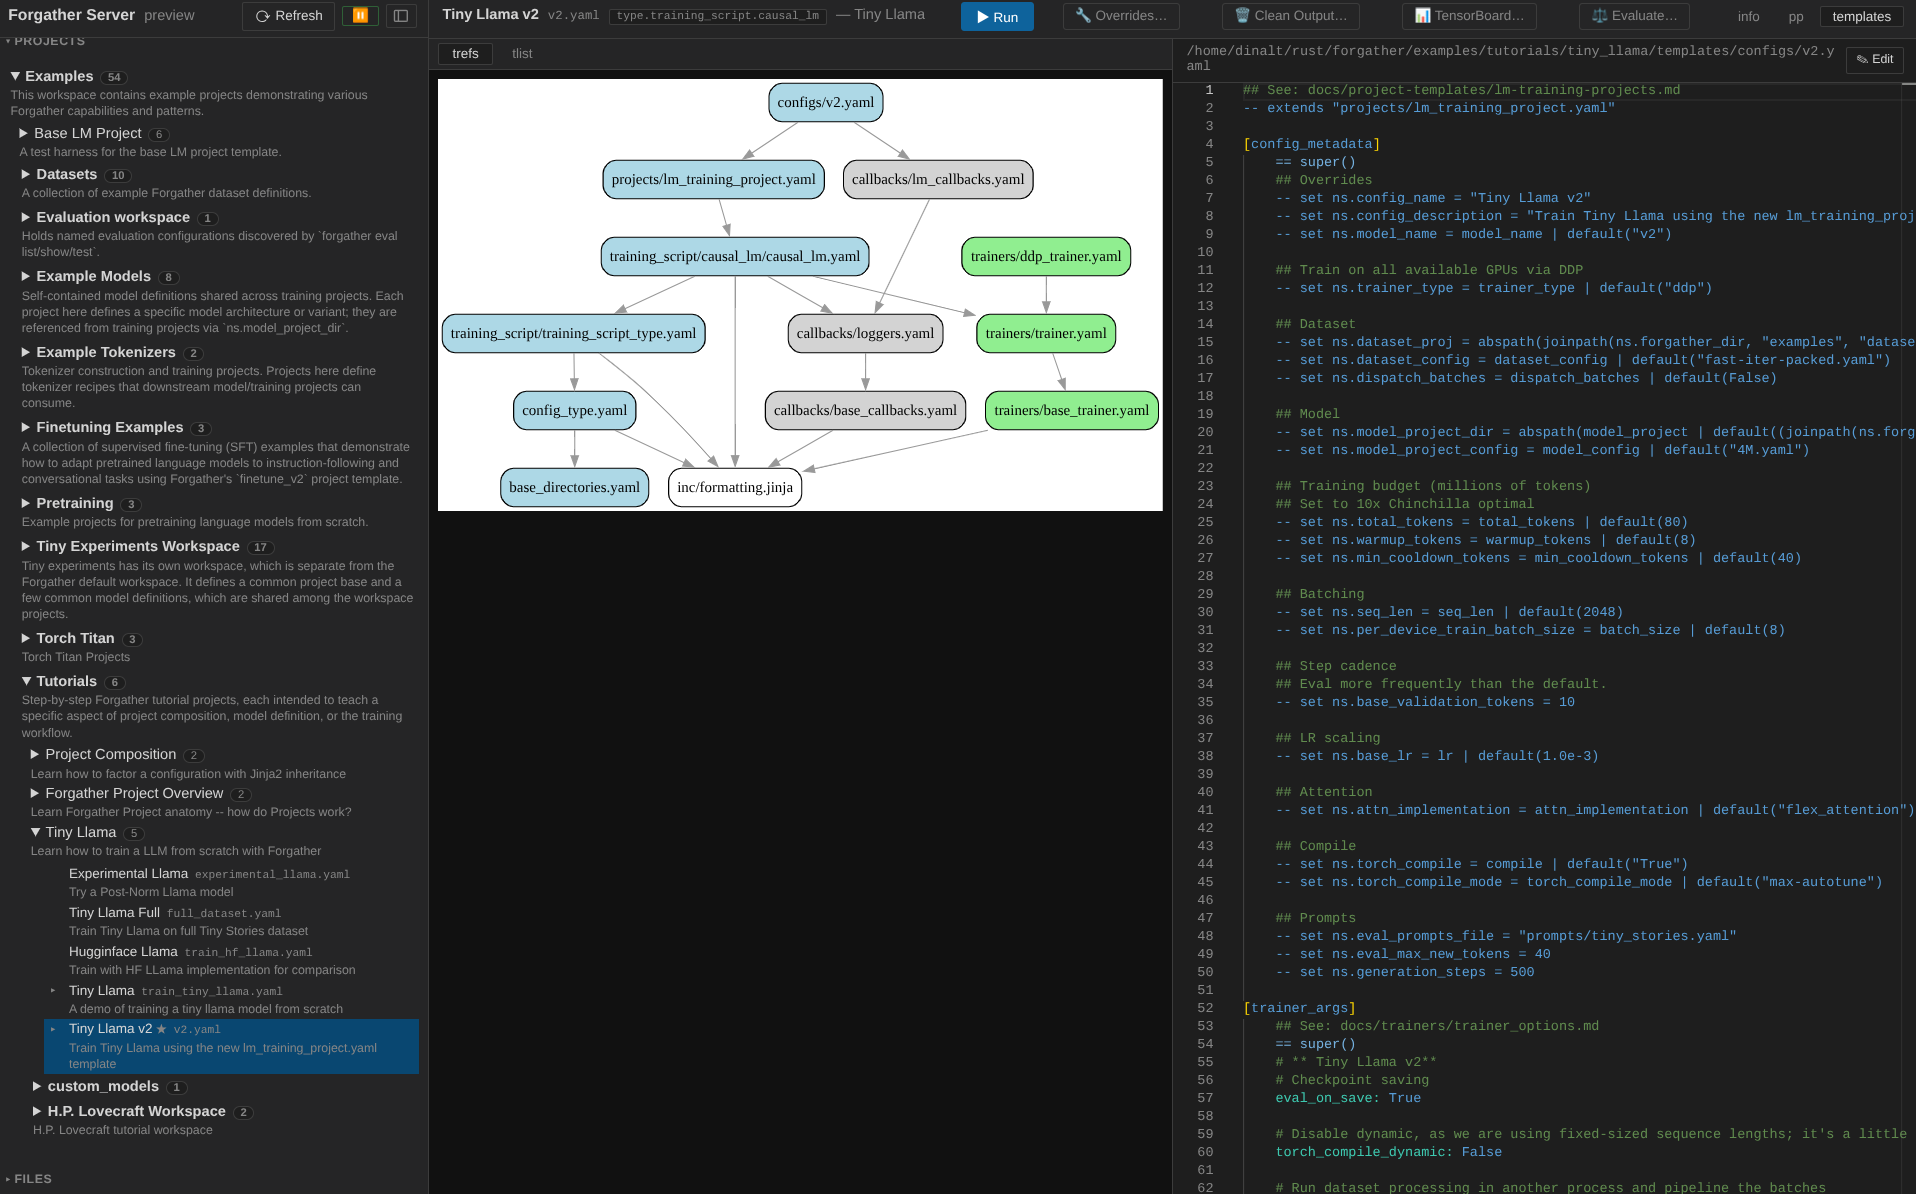
Switch the left-panel mode bar to tlist to see the same templates listed alphabetically by category instead of as a graph. Both views are useful — trefs for understanding which templates compose the config, tlist for finding a specific template by name.
Click pp to see the fully preprocessed YAML — the same thing
forgather pp would print on the CLI. This is what the training
script actually receives. Worth a quick scroll-through to see how
much the templates expand into.
5.1 Start TensorBoard (optional)
Before staring training, we can start TensorBoard to monitor the training job.
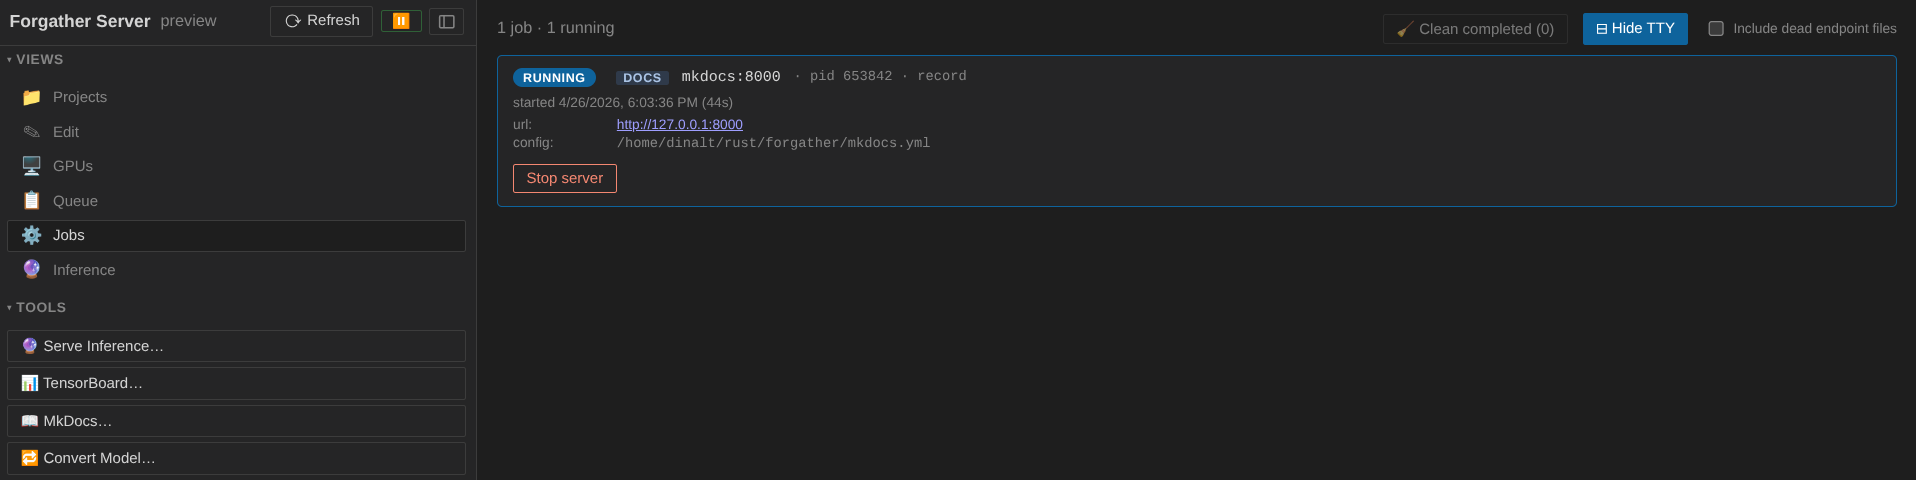
Expand the Services group in the sidebar and click 📊 TensorBoard… (or right click on the configuration and select "TensorBoard…"). This will take you to the "Jobs" panel. You should see a "TB" card, where you can click on the URL to open TensorBoard. Once your training jobs starts, you can monitor progress from here.
Now switch back to the Forgather Server WebUI and click on "Projects" in the sidebar to return to where we left off.
6. Queue and dispatch a training job
Before submitting, it's worth understanding the queue/scheduler split: jobs are enqueued (added to the waiting queue) and then dispatched (handed to a process and assigned GPUs). The dispatcher runs on a 2-second tick and picks idle GPUs based on priority + GPU policies.
You can pause dispatch independently of enqueueing — useful when you want to inspect what's about to run before it actually starts. Click the ▶/⏸ button in the sidebar footer (next to ⟳ Refresh) to toggle. ⏸ means dispatch is paused; new submissions sit in the queue waiting.
For this walkthrough, pause the dispatcher first so you can see the job in the queue panel before it kicks off:

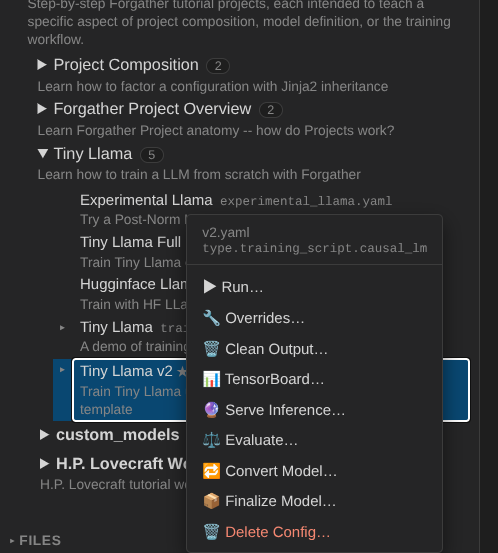
If you have already run the Tiny Llama tutorial, clean the output artifacts by clicking on Clean Output first.
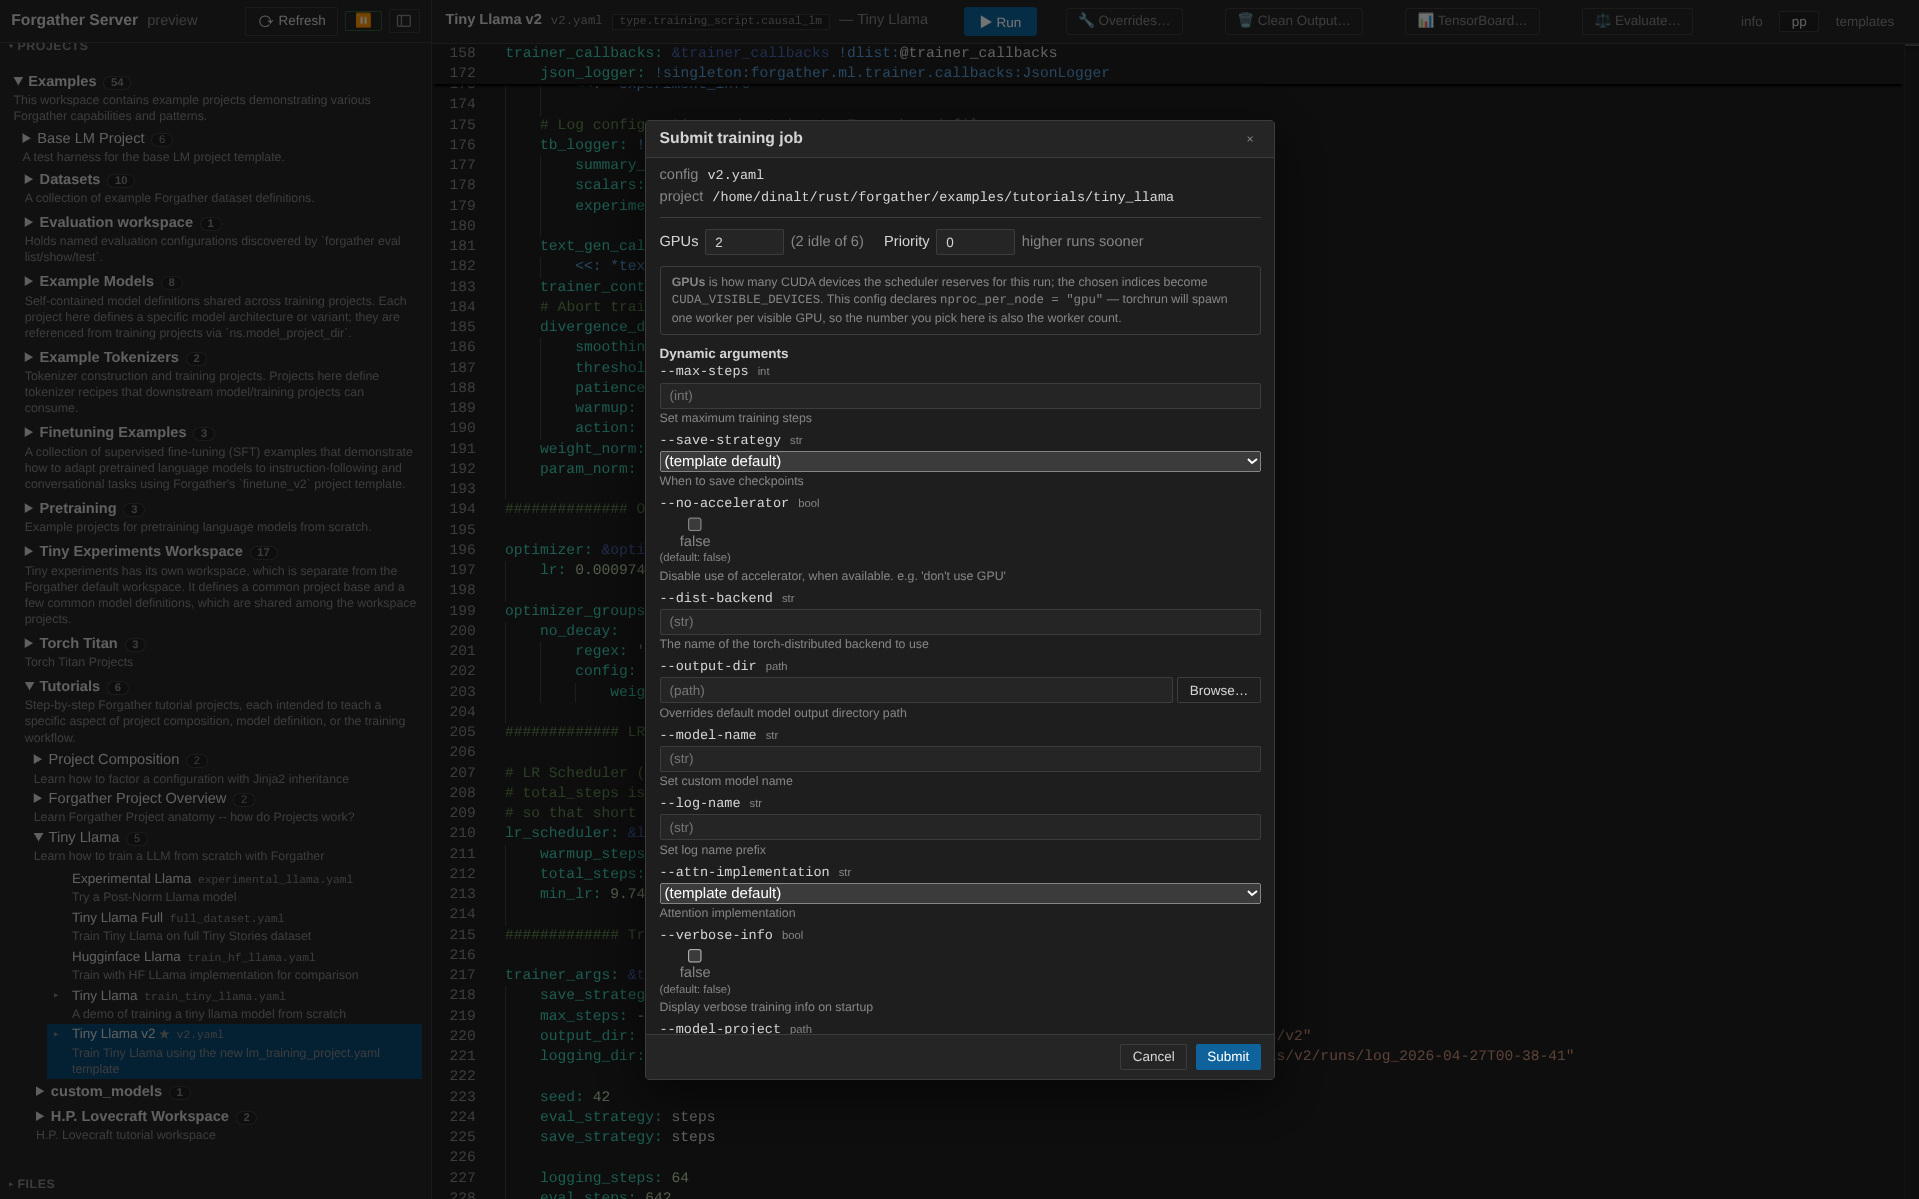
Now back to Projects → examples → tutorials → tiny_llama. The config viewer's header has action buttons including ▶ Run. Click it to open the submit modal.

The submit modal exposes the config's dynamic args, requested GPU
count, and priority. The default v2.yaml config is set up to use however
many GPUs are assigned; if you have more than one GPU, change the Requested GPUs field to
the number of GPUs to use (the config will adapt — single-GPU training still works, just
without DDP). Leave the other fields at their defaults and submit.
Switch to the Queue view (📋 in the sidebar's Views group). The
job appears at the top of the list with status pending, waiting
for the dispatcher.
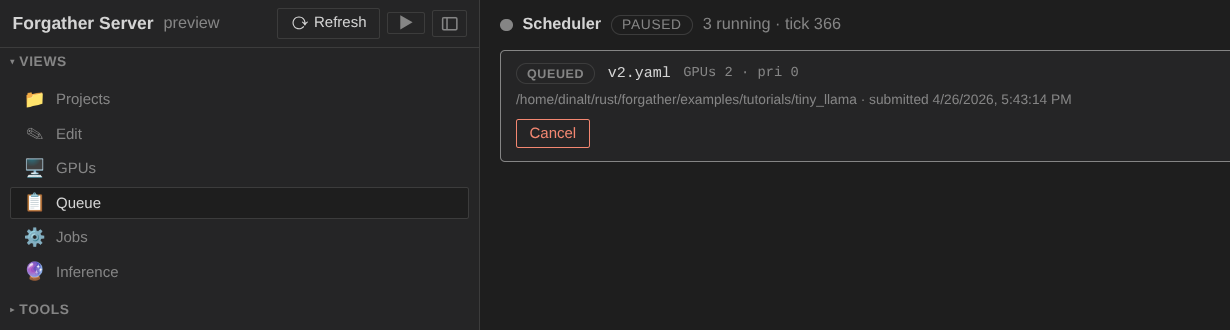
Now click the ⏸/▶ button in the sidebar footer to resume
dispatch. Within a tick or two the scheduler picks GPUs, marks the
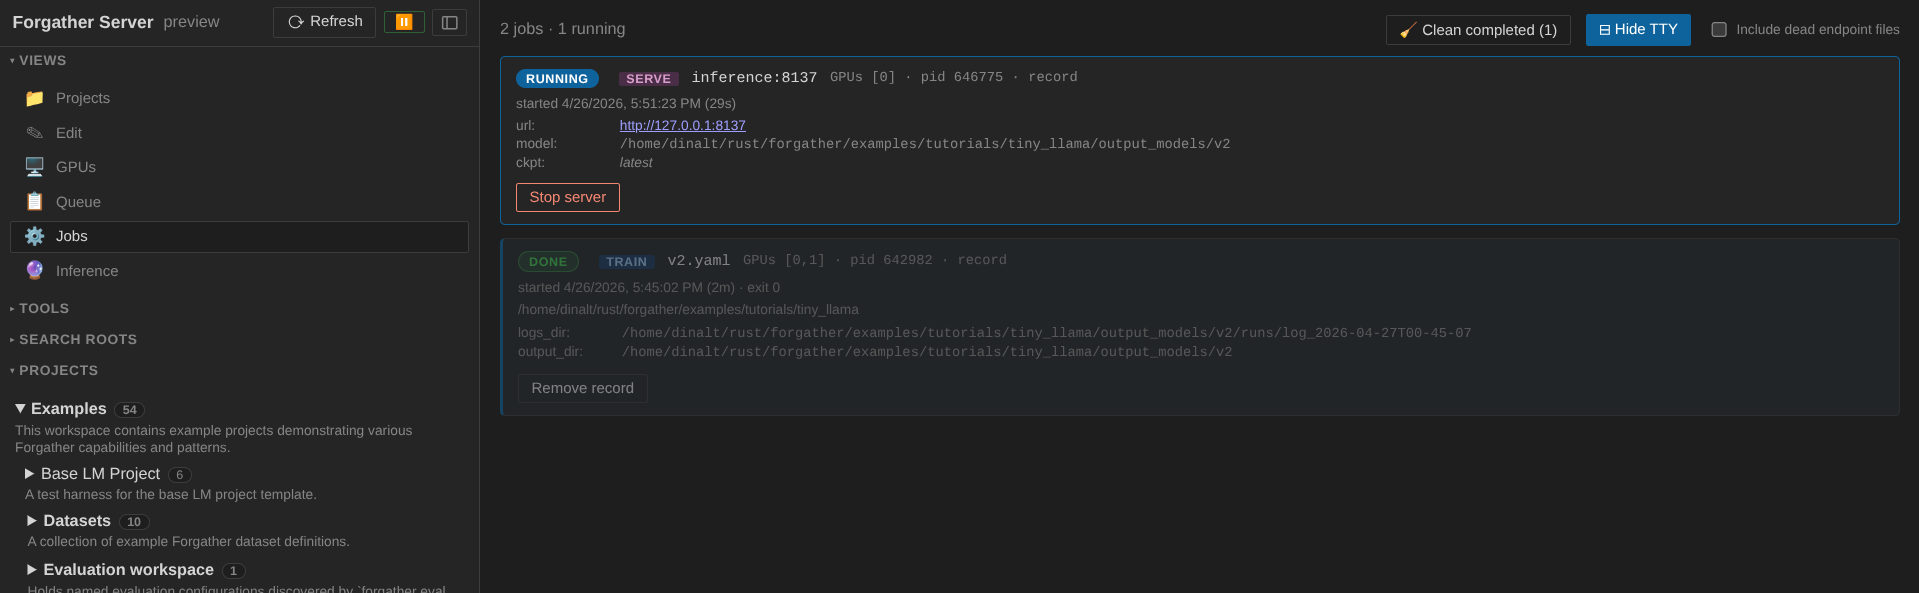
job starting, and then running. The job moves out of the queue
and into the Jobs panel.
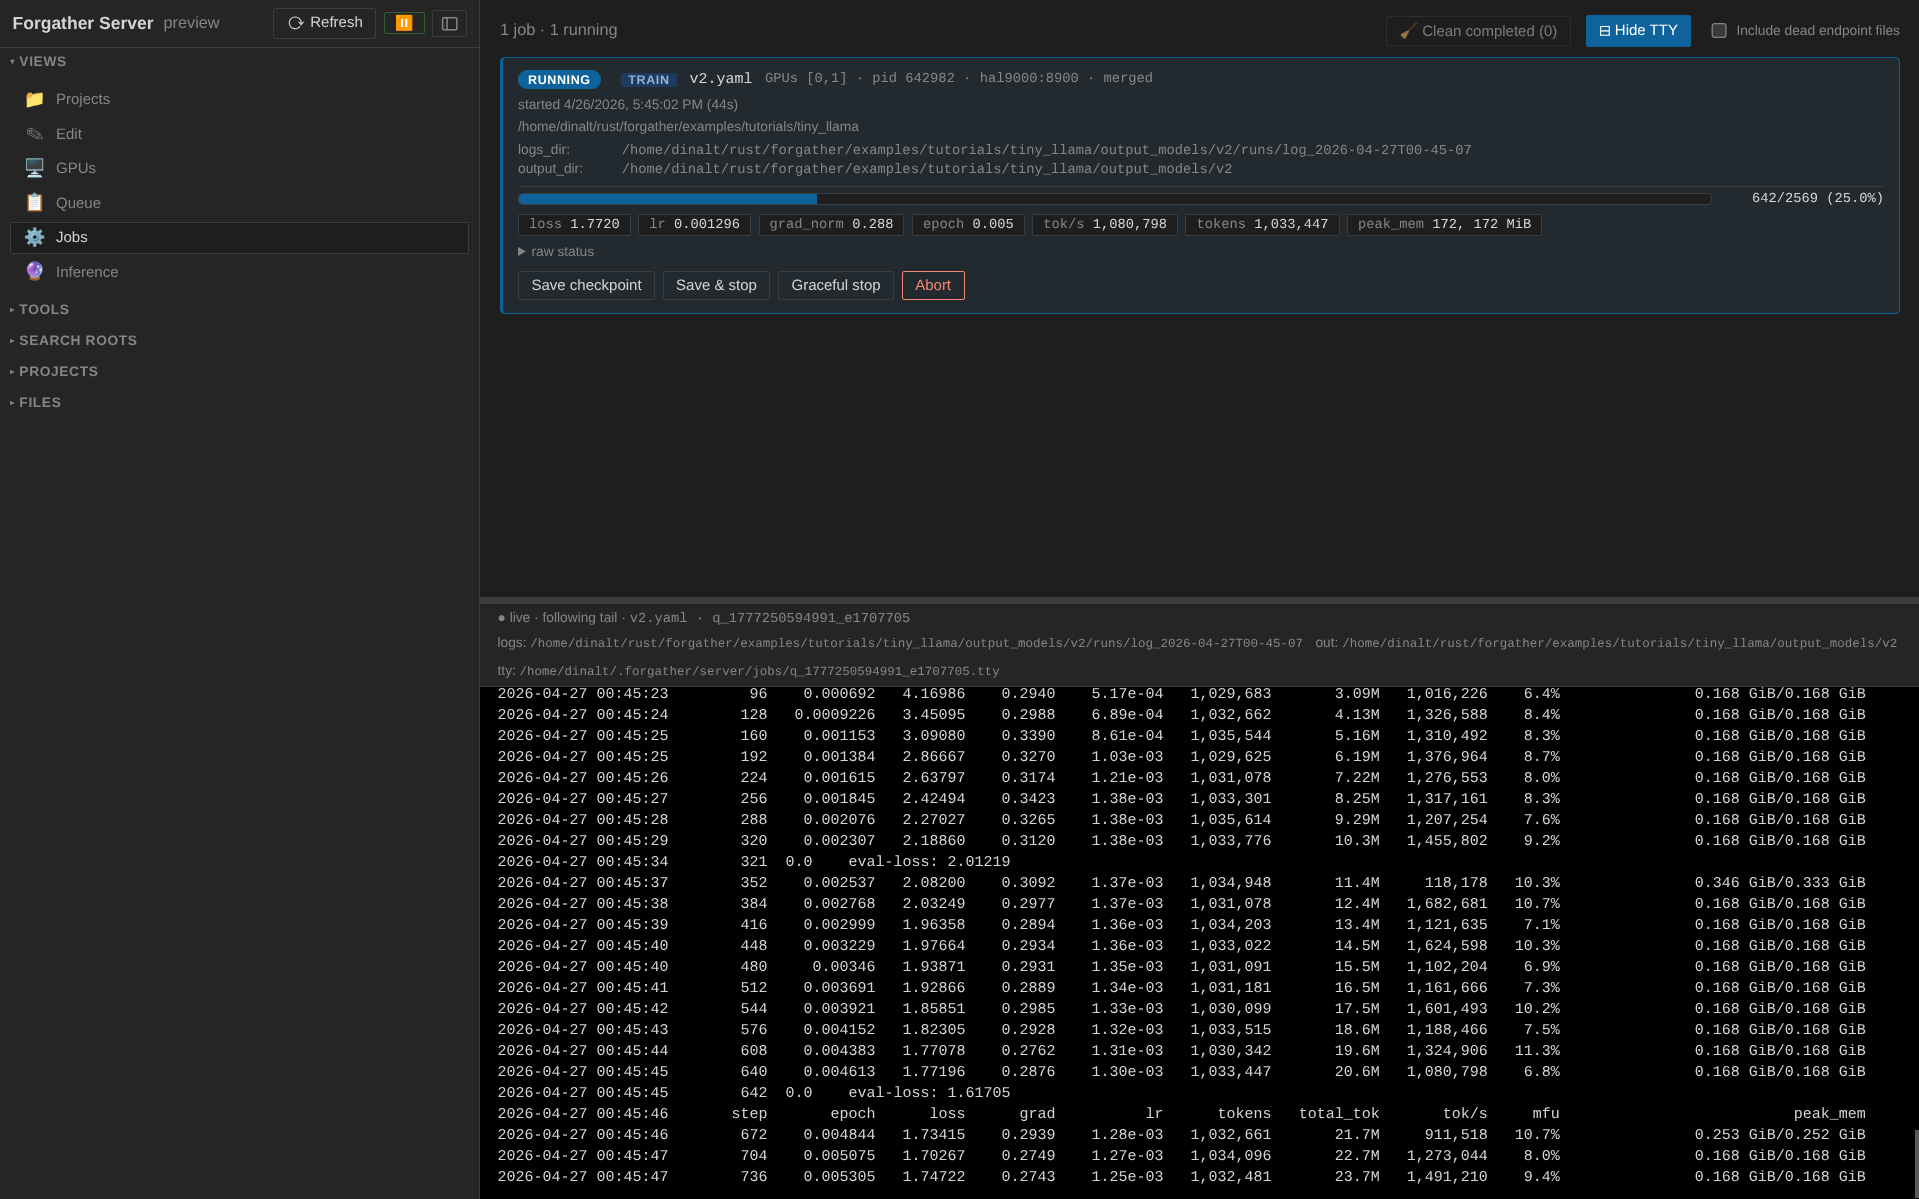
7. Watch the run
Switch to Jobs (⚙ in Views). Your training job is the first card, showing live status pills (loss, lr, grad_norm, epoch, tok/s, peak memory) plus a progress bar.

Toggle ⊞ Show TTY at the top of the panel. The view splits
horizontally; clicking the job card routes its captured stdout/stderr
to the bottom pane. Loss / lr lines stream in as the trainer reports
them — it's the same output forgather train would print in your
terminal, just captured server-side so you can scroll back through it.
Flip to the GPUs view (🖥) to see live utilization, memory, power, and temperature. The GPUs assigned to your job glow blue and show a process chip mapping back to the running job's config name; idle GPUs are dimmed.
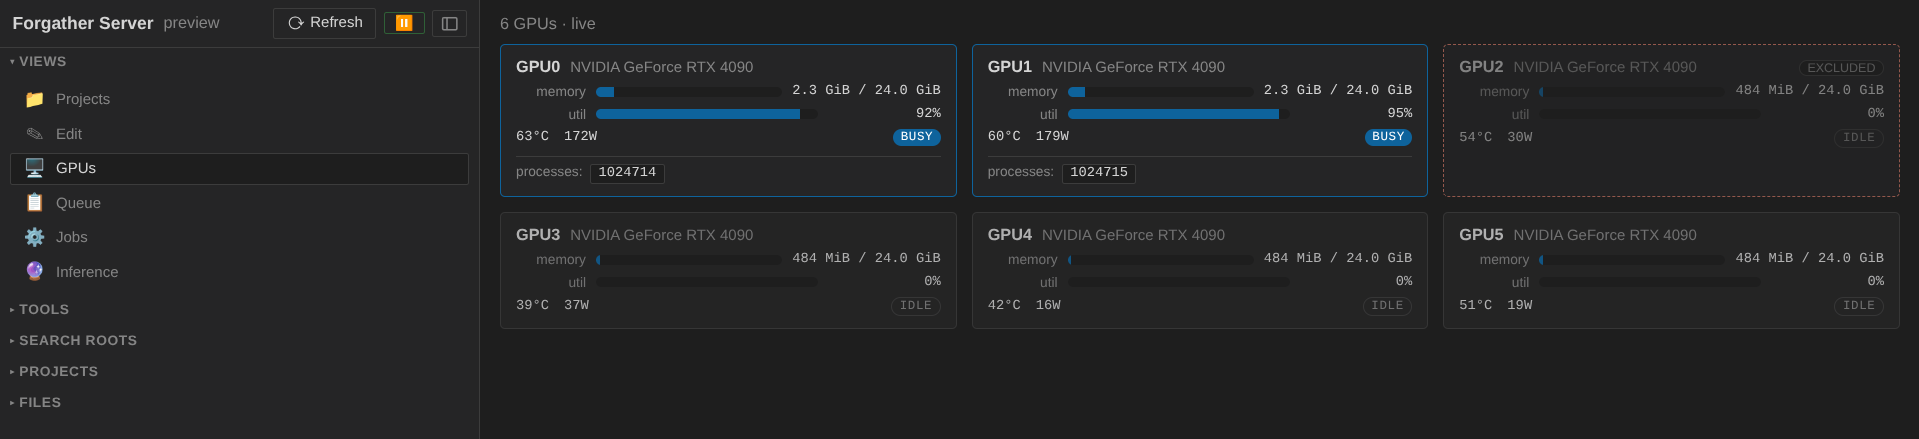
Wait for the run to finish — about 2 minutes on an RTX 4090, longer
on smaller cards. When it does, the job card flips to done, the
GPUs go idle, and the loss should have come down to somewhere around
2.5 (TinyStories is friendly to small models).
If you return to the projects panel, you will see that the outputs have been associated with the training run.
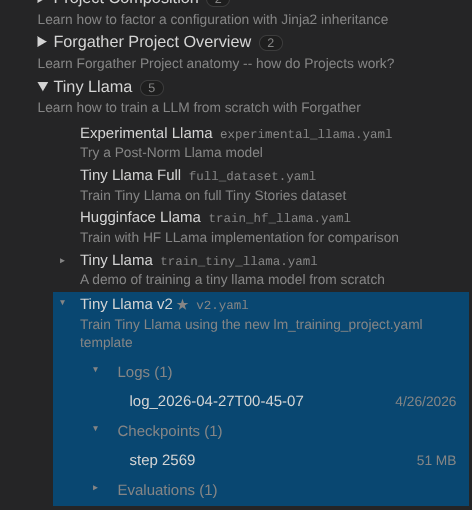
You can summarize the run by clicking on the completed log and selecting the "summary" tab.
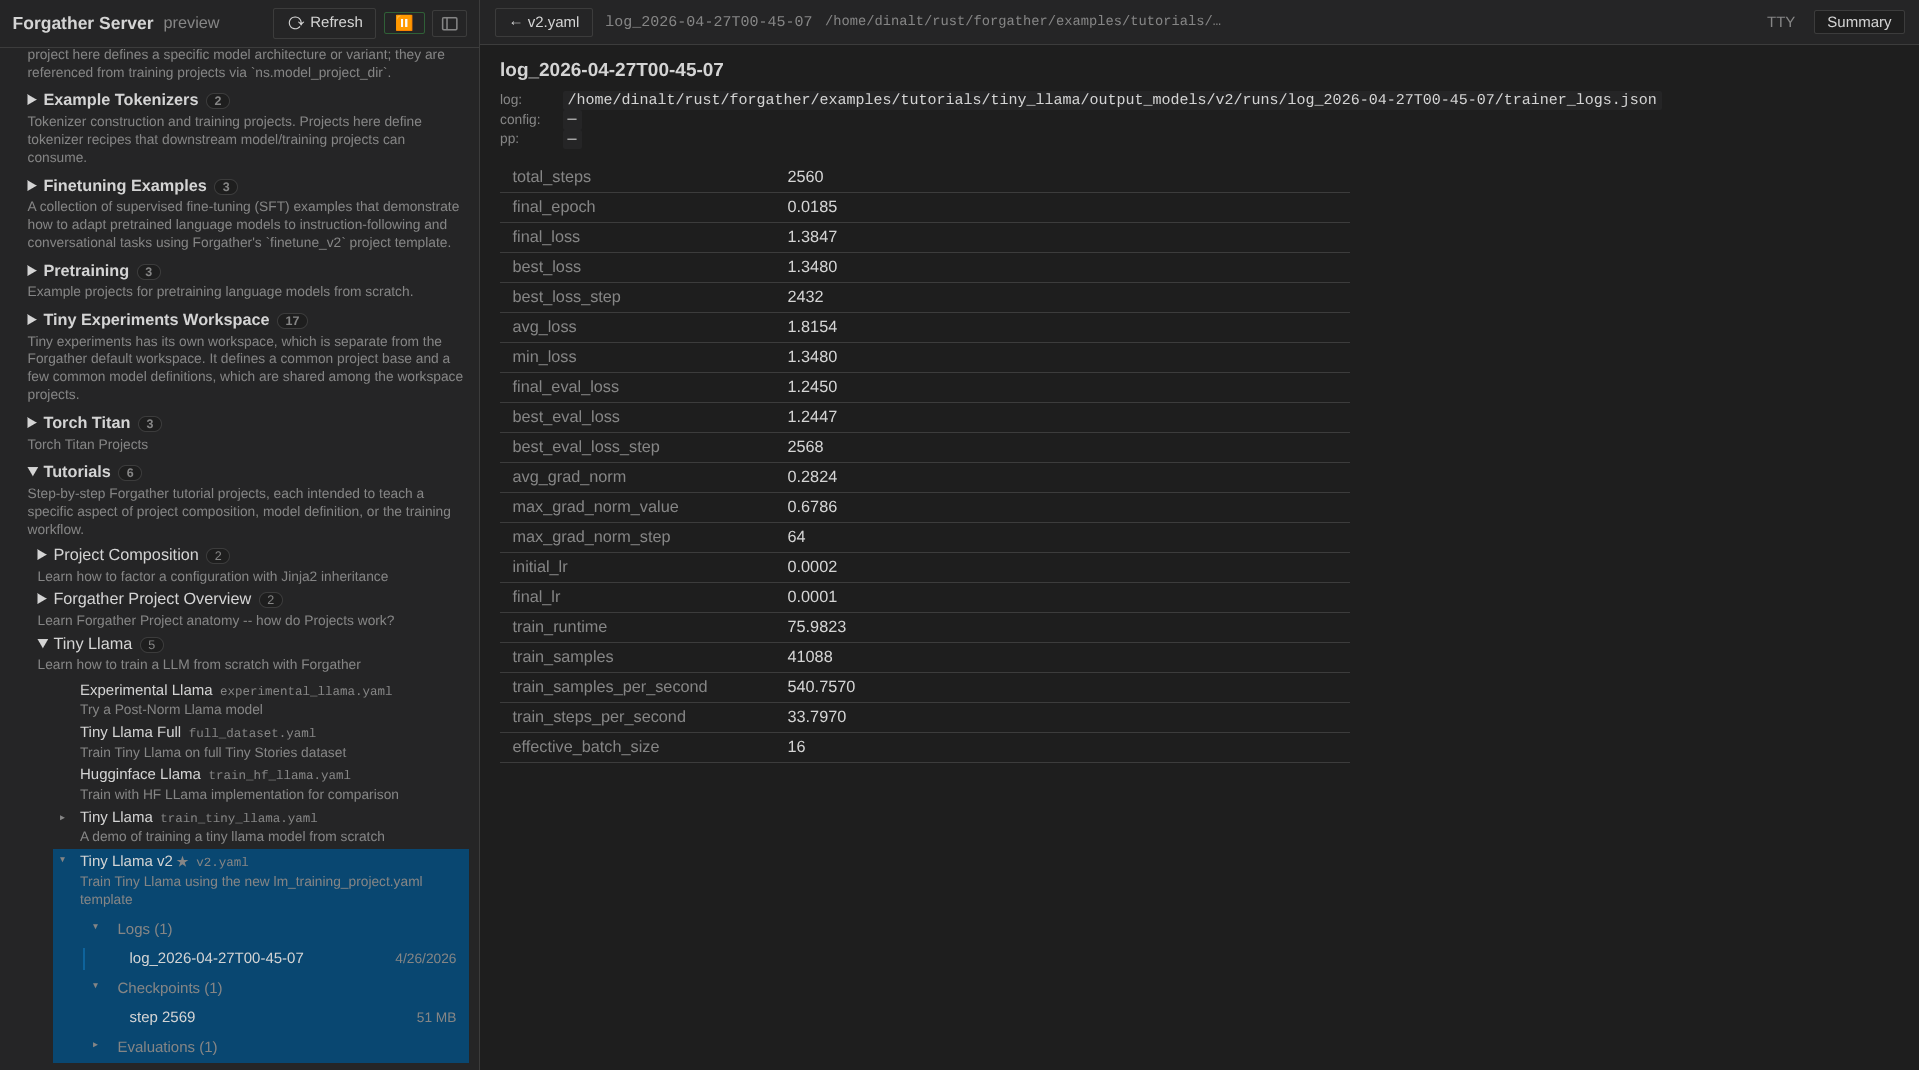
…or scroll the TTY pane in the UI to the bottom to see the trainer's own summary line.
8. Serve the trained model
The trained checkpoint lands at
examples/tutorials/tiny_llama/output_models/tiny_llama/. To chat
with it (such as it is), spawn an inference server.
In Projects, with v2.yaml selected, the config viewer's header
now also shows 🔮 Serve Inference… and ⚖ Evaluate… buttons —
they appear once a config has at least one checkpoint on disk.
Click 🔮 Serve Inference…. The modal pre-fills the model output dir; leave the dtype / attention / cache impl at defaults and submit.
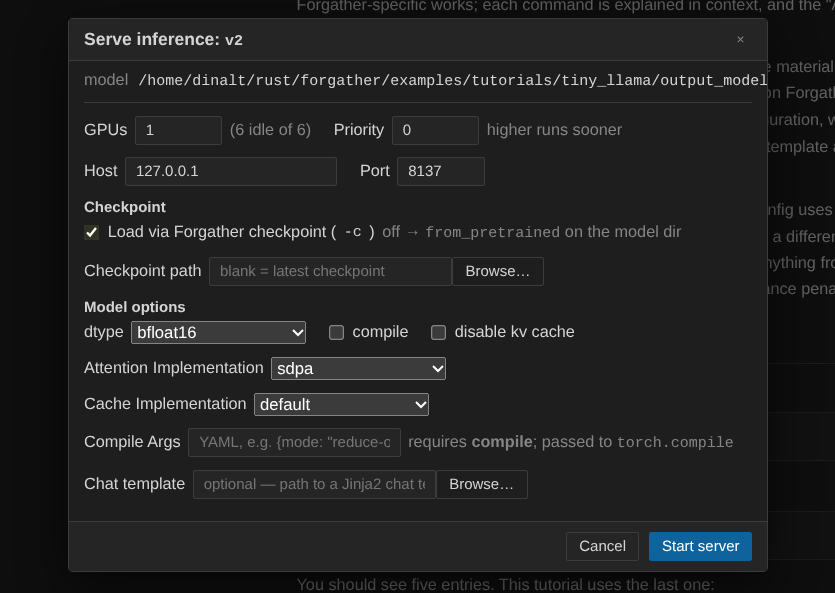
The inference job appears in the Jobs panel like the training job did, but with a clickable URL on its card — port 8137 by default. Wait for the job to finish loading the model (the TTY shows a "ready" message); usually takes ~10 seconds for a 4M model.
9. Generate text
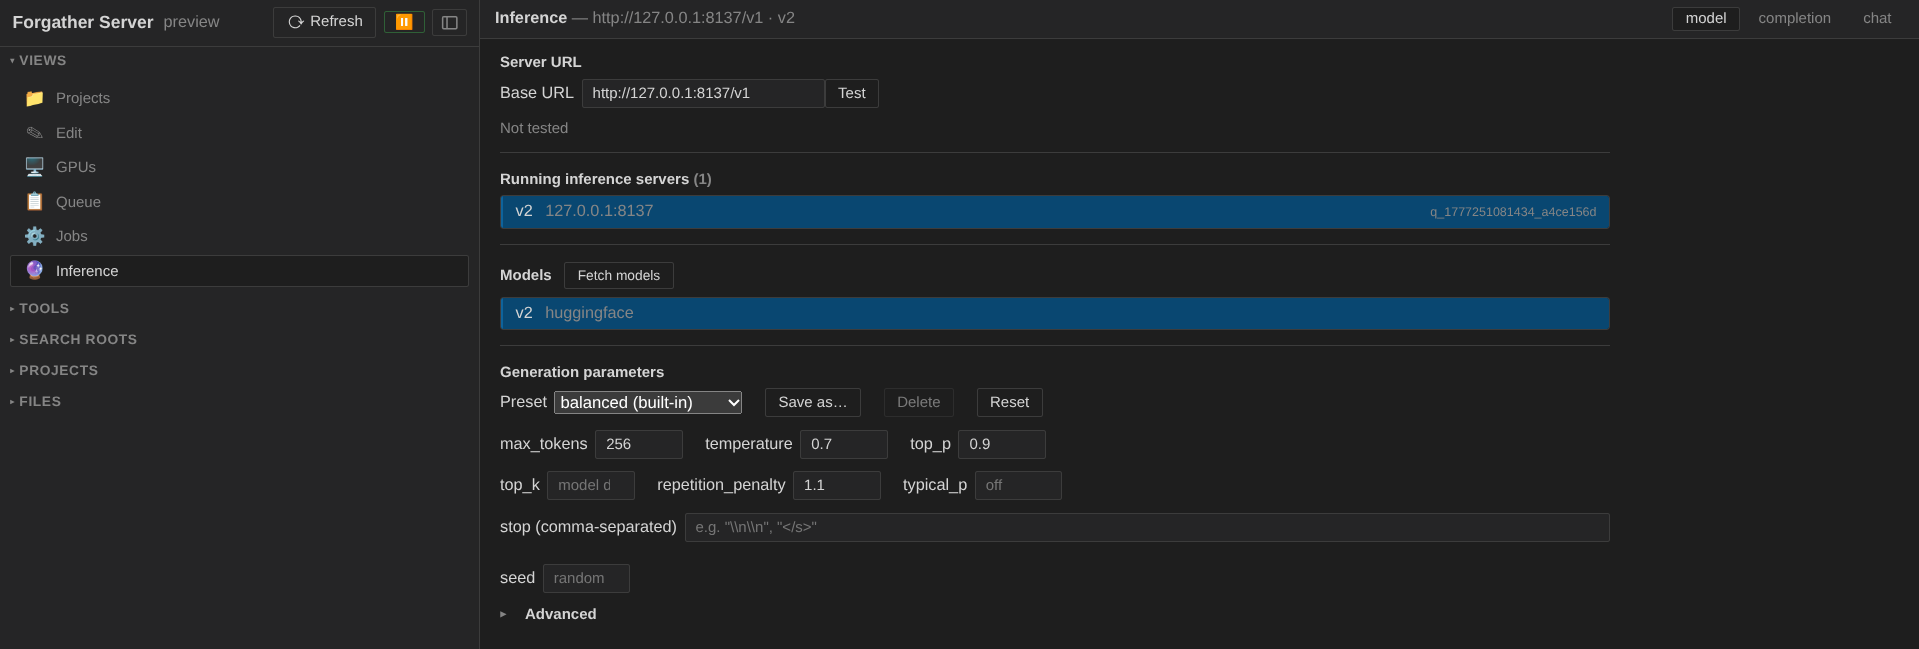
Switch to Inference (🔮 in Views). The view has three sub-tabs: Model, Completion, Chat.
Start in Model:
- Click the Running inference servers picker — the inference job you just started appears as an option. Selecting it auto-fills the base URL.
- Click Fetch models to discover the model id the server
advertises (
tiny_llamaor similar). Pick it. - Optionally apply a generation preset from the picker —
creativeproduces livelier outputs,preciseis more deterministic. Thecreativepreset is a good fit for TinyStories-style stories.
Switch to Completion. In the textarea, type:
…and click Send. The streamed output appears below. With a 4M-parameter model trained for two minutes, you should get a reasonably coherent (if simple) short story.
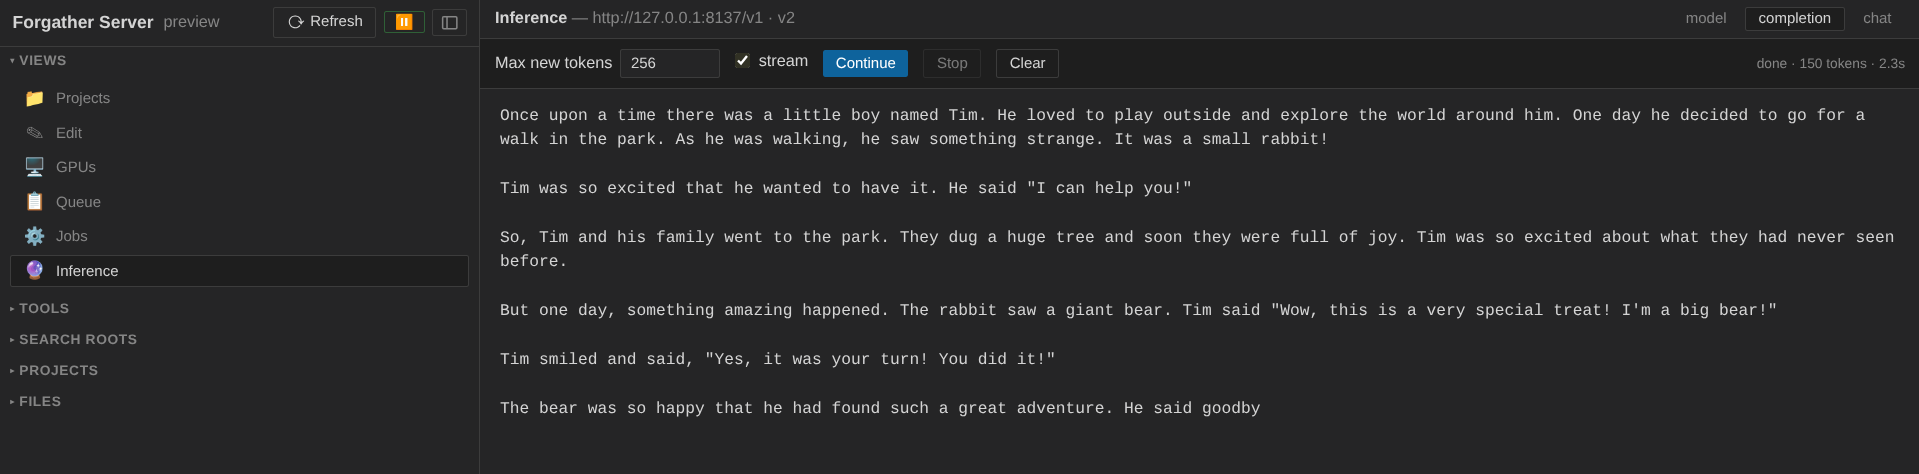
The status line under the textarea reports tokens generated and elapsed time. Try a few prompts to get a feel for how the model behaves; flip back to Model to swap presets and see how the distribution changes.
10. Train the model for chat
If you tried the inference server's Chat tab, you'll have noticed that the tiny model has no concept of turn-taking — it just keeps generating. We can fix that by finetuning it on a chat-style dataset.
Finalize the base model
Before finetuning, we finalize the base model. This builds a self-contained copy so the original training weights stay intact, and at the same time:
- adds a chat template (ChatML by default),
- adds chat-related special tokens (
<|im_start|>,<|im_end|>) and registers<|im_end|>as a stop token alongside the model's EOS, - attaches a generation config preset,
- strips redundant checkpoints, and
- loads with
AutoModelForCausalLM.from_pretrained(...).
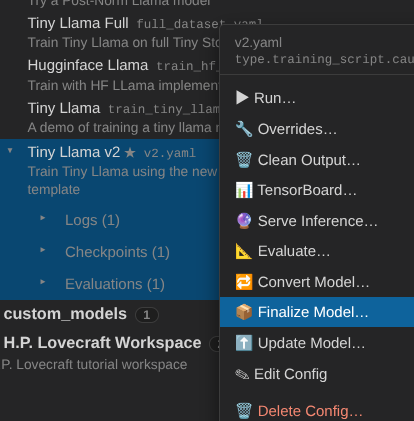
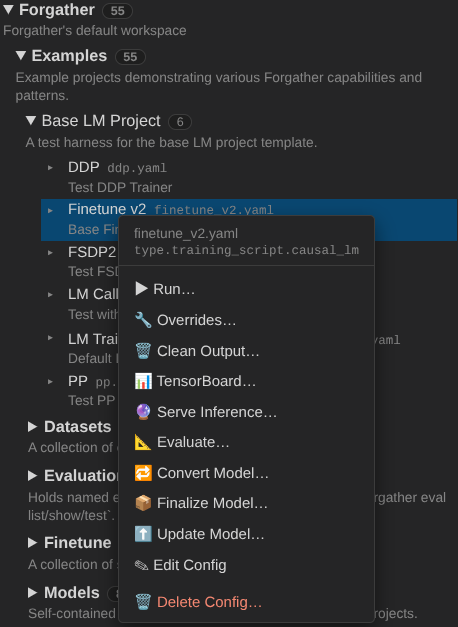
In the Projects tree, right-click the v2.yaml config under
tiny_llama and choose Finalize Model….
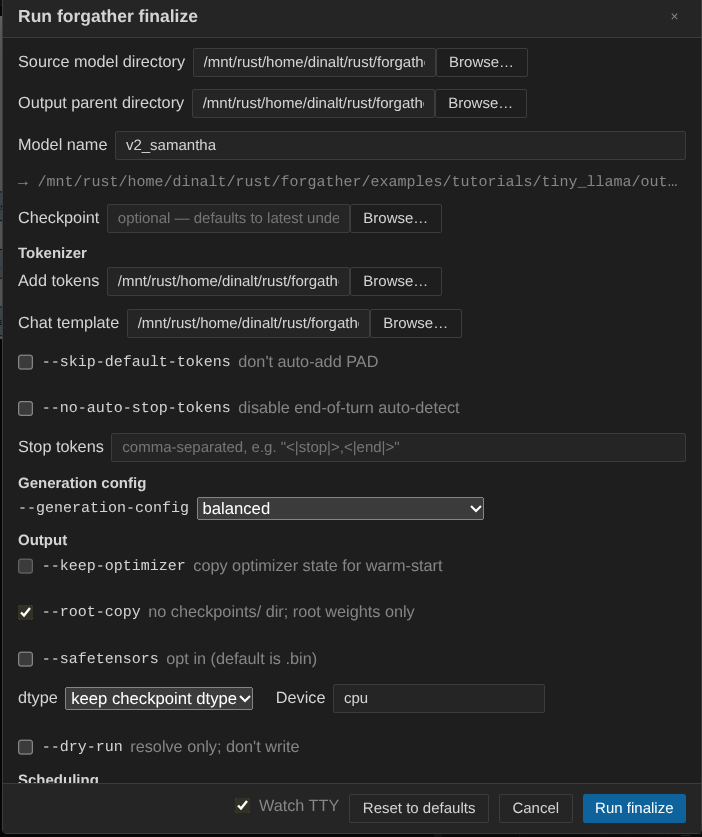
The Source field is pre-filled with the trained Tiny Llama
output. Set the Output directory (the screenshot uses the
tutorial's output_models/ directory) and give the new model a
name — v2_samantha here.
Leave the chat template at ChatML (you can override it if
needed). The default Add Tokens entries add the ChatML special
tokens and the <|im_end|> stop token. Optionally pick a
Generation Config preset — balanced is a reasonable starting
point.
I have also checked --root-copy, which places the model weights directly in
the root of the output directory, rather than in a checkponints/ sub-directory.
If you don't check this, symlinks to the checkpoint will be added instead.
When the form looks right, click Run finalize. The new model is built in place and is ready to train on a chat dataset.
Set up the finetune config
There's a Samantha tutorial dedicated to this kind of training, but here we'll use the generic Finetune v2 project so you can see how the override system works from the UI.
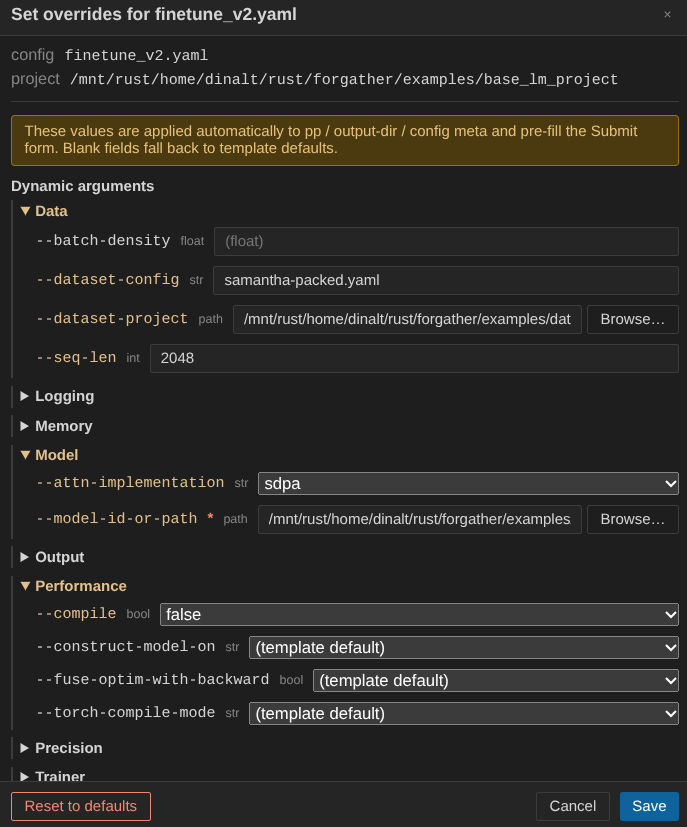
Navigate to Projects → examples → base_lm_project, right-click the Finetune v2 config, and choose Overrides….
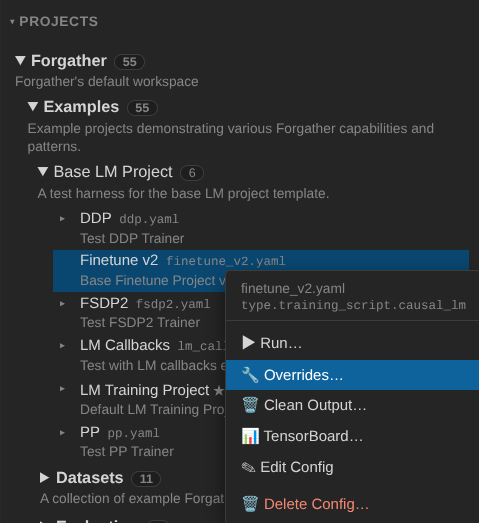
The Overrides panel exposes the config's CLI arguments. Finetune
v2 has one required argument with no default — --model-id-or-path
— so it's pre-expanded and highlighted red on first open.
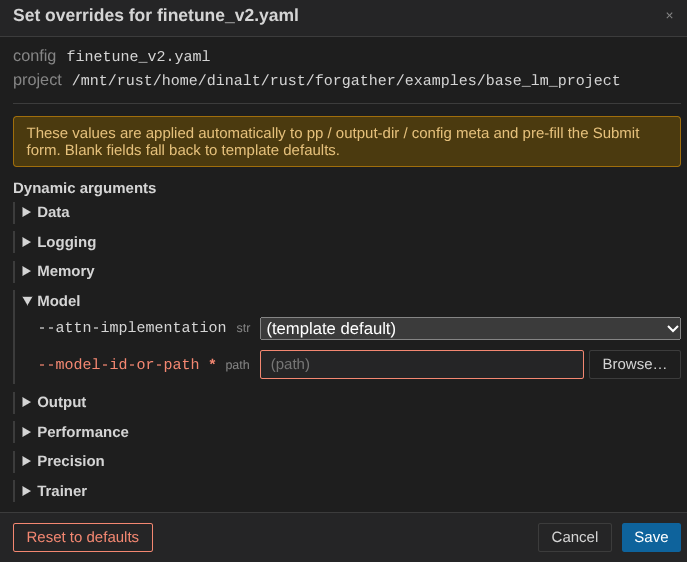
Fill in the fields:
--model-id-or-path— path to the finalized model (output_models/tiny_samantha, or wherever you saved it).- Under Data, set
--dataset-projecttoexamples/datasets/QuixiAIand--dataset-configtosamantha-packed.yaml. --seq-len—2048(Tiny Llama's maximum sequence length).--attn-implementation—sdpa. The project defaults toflex_attention, which is the preferred setting for packed datasets, but the upfront compile cost isn't worth it for a model this small.--compile—false, for the same reason: skip the Torch compile step.
Click Save. These overrides persist for this config. Switch to the pp tab to confirm — you'll see the override values baked into the preprocessed YAML.
Run the finetune
If the inference server from the previous section is still running, switch to Jobs and abort it — we want the GPU back.
Click ▶ Run in the config viewer's header. In the submit modal,
make sure Requested GPUs is 1 — the default trainer only
supports a single GPU. (If you'd rather use multiple GPUs, change
the trainer type to DDP in the config first.)
The job auto-focuses in the Jobs panel once it starts so you can watch the loss come down. Finetuning is short.
When the job finishes, right-click the Finetune v2 config and choose Serve Inference…. The pre-filled defaults are fine — just click Start server.
Switch back to the Inference view and open the Chat tab. The model should now respect turn-taking.
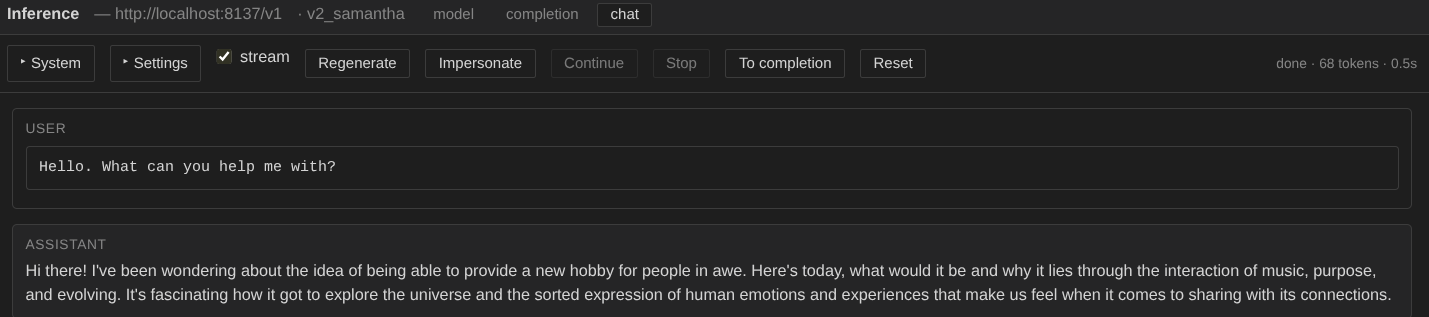
It's still a tiny model with very little training, so don't expect coherent answers. For something with a fighting chance of holding a conversation, see the Small LLM Pretraining example.
Saving a service for next time
The four service modals (Inference, Dataset, TensorBoard, MkDocs)
each have a Create service… button beside their Start button.
Click it, give the entry a name, and the modal's current settings are
persisted to server_config.yaml as an auto-start service. On every
subsequent server boot the entry is brought up automatically —
without re-opening the modal.
Saved entries appear in the Services sidebar group nested under their type's launcher row, with:
- A right-aligned pill on the launcher row showing how many instances of that type are running.
- A chevron to the left of the launcher row that expands the per-type list (hidden when the type has no saved entries).
- A red/green dot per entry — green only when the spawned
process is actually serving (
JobRecord status == "running"), not just queued. - A ▶ / ⏹ toggle that flips the entry's
enabledflag and starts / stops the running instance accordingly. - An × that deletes the entry (and aborts the running instance, if any).
To stop using a service temporarily without losing its config: ⏹. To remove it entirely: ×. The signature of a saved entry is matched against running queue items and JobRecords, so a manually-launched job with the same args counts as "the running instance" — restarting the server won't double-spawn.
Persistent CLI defaults
forgather server reads <config>/server/server_config.yaml on
boot. Anything under args: overrides the corresponding CLI default;
values passed on the command line still win. Useful for persistent
preferences like cluster:, custom host: / port:, or
persist_sessions: true (the next bullet).
The footer's ⚙ button opens this file in the embedded editor; the ⟳ button next to it re-execs the server so edits take effect without killing the terminal session (running jobs survive — the new server re-attaches to them via the standard PID-reattach path).
args:
  cluster: my-cluster
  persist_sessions: true       # browser stays logged in across restarts
services:
  inference:
    llama:
      enabled: true
      model_path: /models/llama
      port: 8137
persist_sessions: true (or --persist-sessions on the command
line) keeps the browser session cookie valid across restarts so
hitting ⟳ during development doesn't force a re-login every time.
The 30-day session TTL still applies, and /api/auth/logout (or
deleting <config>/server/sessions.json) still revokes.
What's next
You've now seen most of the major panels. Some directions for follow-up:
- The Tiny Llama tutorial covers the same project from the CLI side, with deeper notes on the config's structure, TensorBoard monitoring, loss plots, and programmatic model loading.
- The Forgather server README is the reference for every panel, every endpoint, and every context menu — useful when you want to know "what does this button do" without reading source.
- Right-click context menus exist on workspaces, projects, configs, search roots, file-tree rows, GPU cards, and Job cards. Each has scope-appropriate actions (delete, rename, cut/copy/paste, force kill, etc.). Worth poking around once you've finished the basic flow.
- Try editing a config: right-click the project → 📄 New Config… for a blank, or click ✎ Edit on a template node in the trefs view to open it in the Edit panel's tabbed Monaco editor with full syntax highlighting for Forgather's YAML+Jinja2 dialect.
Have fun.